Installing a multimedia system and other elements
Earlier, we have already published an article here. Now, we publish a similar material for the owners of "Chisel" with a high torpedo. If we consider the sad glory of this torpedo as the most rummy, it is quite easy to understand why the owners of these cars are ready to spend a lot of time to silence it. High torpedo removal has almost 2 times more steps than the removal of low ...
As in the case of a low panel, we will perform work related to the electrical equipment of the machine, which means the first thing to remove the terminals from the battery.
1. Remove the decorative steering wheel lining.

2. Remove the steering wheel fastening nut so that the ends of the nut is flush with the end of the steering column shaft.

3. The steering wheel sits very tightly on the slots of the shaft, so do not turn away immediately the wheel fastening nut: with a sharp blow steering wheel, jumping from the slots, can cause injury. Stitch the position of the steering wheel relative to the shaft.

4. Hands with harsh strikes Run steering wheel with steering slots

5. Finally unscrew the nut and remove the steering wheel.

6. Unscrew the six screws for fastening the bottom of the steering column.

7. Remove the bottom cover of the steering column and cladding the ignition switch.

8. Remove the top horn of the steering column.

9. Loosen the tightening of the bolt of fastening the base of the submissive switches.

10. Remove the base from the shaft and disconnect the two pads with wires from the sound signal contacts.

11. Disconnect the block with wires from the wiper and washer switch lever.

12. When disconnecting the pads with wires, we recommend to march them. This will avoid confusion when assembling and save your time.

13. Disconnect the shoe with wires from the rotator and headlights switch switch.

14. Pull the handle of the carburetor air damper (samples) so that the thrust appears, and remove the handle from it.

15. Remove the two screws of the appliance panel console fastening screws.

16. Remove the lining from the console.

17. Remove the cigarette lighter cartridge from the nest.

18. Remove the ashtray from the nest by clicking on the plane to clean the cigarettes.

19. Remove the heater fan switch knob.

20. Remove the three heater control knobs, making them with a screwdriver.

21. Disconnect the block with wires from the heater fan switch under the heater control panel.

22. Disconnect the two wires from the contact panel of the heater backlight.

23. Remove the head of the headlight hydrocorrector, pulling it on.

24. Remove the instrument combination lighting switch knob.

25. Unscrew the fastening of the instrument combination lighting switch.

26. Unscrew the headlights of the headlights hydrocorrector fastening nut.

27. Push inside the panel switch lighting switch combination and headlight warhead.

28. Remove the side nozzles on both sides of the instrument panel using a screwdriver.

29. Unscrew one-sides of the instrument panel on both sides of the instrument panel.

30. Picture the outdoor lighting switch from the panel.

31. Disconnect the shield with wires from the outer lighting switch. Push the block inside the instrument panel.

32. Picture the screwdriver and remove the magnetic socket. If an audio equipment is installed on the car, you first remove it.

33. Magnitol remove in accordance with the instructions of the manufacturer.

34, unscrew the screw fastening of the instrument panel lining.

35. Insert two screwdrivers to bend plastic latches.

36. Lift the instrument panel cover.

37. Disconnect the shock with wires from the cigarette lighter pad.

38. Disconnect the block with wires from the cigarette lighter backlight pad.

39. Disconnect the block with wires from the emergency signaling switch illumination.

40. Disconnect the block with wires from the alarm switch and finally remove the instrument panel lining.

41. Gently press down and remove the loudspeaker cladding on the left side of the instrument panel. Be careful - the latches are easily laid out.

42. Disconnect the shoe with wires from the heating door heating switch.

43. Remove the block from the rear fog lantern switch.

44. Unscrew the two screws of the instrument combination.

45. Remove the combination of instruments from the panel, screw the fastening nut and disconnect the cable from the speedometer.
A warning
Disconnect the pads with the wires of additional equipment if it is installed on your car.
The first option requires the improvement of the fuel supply system by mechanical node, namely the carburetor:
- You need to install a throttle or diffuser of more updated models.
- You should carefully remove the springs in the primary chamber on the throttle drive.
This kind of tuning of the carburetor significantly increases the air flow, allows the engine to "breathe", significantly increases its characteristics of the speakers and power.
The second option provides for the acquisition and installation of a special block - controller. This device is a carrier of software. Thanks to this, it is possible to increase the power indicators, torque and, of course, the dynamics.
Exercise tuning suspension VAZ-21099
Update the suspension of the vase is necessary according to many lovers of auto scheme known to many:
- high-quality installation of two-section shock absorbers;
- production of replacement of transverse type stabilizers;
- installing updated brake discs;
- installation of an updated hub;
- the product of the replacement of hinges for spherical;
- conducting a suspension lifting procedure by establishing advanced springs.
Salon tuning for VAZ-21099
This procedure conventionally consists of two stages:
- Replacing seats for new / work of modernization of regular front. For example, summing up the heating system, tosing a high-quality modern cloth.
- Refreshing the cabin. Such innovations are easy to produce independently or by purchasing a new set in the ready-made form.
- Installation of figured carbon inserts (you can choose wooden, plastic, chromed, etc.) on the side panels of the car doors. Thanks to this, the car inside will look more representative and elegant.
Finally, one hundred IT to draw the attention of readers to the fact that the work of tuning salon VAZ-21099 is more creative process, rather than technical. Here you will need to show a lot of patience, accuracy and accuracy in decisions, in order to get a high-quality tuning that can make a proper impression on the most owner of the car and in foreign people.
The VAZ 2109 panel is made of special energy absorbing material. It consists of a lining and, in fact, the panel itself.
It is made from plastics. Its thickness - 3 mm. The lining, in fact, reinforced by a special metal frame. It has a reliable power absorbing layer made of polyurethane foam. From the outdoor, it is lined with a special decorative film. A low and high panel of VAZ 2109 can be installed on the car, as well as "Europelel".
High panel VAZ 2109, as low, has certain features that should be considered when they are installed. It should be noted that "Europantel" and the high panel by the installation method is almost identical, since the places of fastening, as well as connecting the air ducts of the automotive ventilation system and the heating they have the same. Differences concern only switching of wiring harnesses. (Presented in the photo below, read more about it even more).


How to spend easy tuning dashboard VAZ-2109 do it yourself

During the salon of the domestic "nine" tuning of its "tidy" becomes a truly indispensable element. Beautiful modifications can be performed with your own hands. To do this, you will need to make a new dial on your computer using special design programs and printing a picture on the printer.
However, you must first clearly consider the appearance of the dials for the machine tachometer and the speedometer, as well as for all sensors that remain. When the dials are printed, they need to be illented, and then you can proceed to removing the instrument panel.
In order for it correctly, you should first remove the steering wheel pads, as well as march the steering position relative to the shaft. Then it should be carefully screwed down the fastening nut.
Next, you can remove the steering wheel and unscrew the screws that are located in the area of \u200b\u200bthe automotive lower casing. After that, you will have to disassemble the steering column. When the dashboard is dismantled, the arrows at the old speedometer and the tachometer should be unscrewed. Subsequently, they will be fixed on updated dials.
During also the dials and arrows to repaint in bright colors. For this, conventional paint cans are suitable. At the same time, the dial is better to make a saturated black.
You can give it a mattiness with the help of special means. In this case, the arrows need to be painted in bright pink or original red-burgundy tones. After the painted plates of the machine dial are dry, they are equipped with an old or pre-prepared scale and removed arrows.
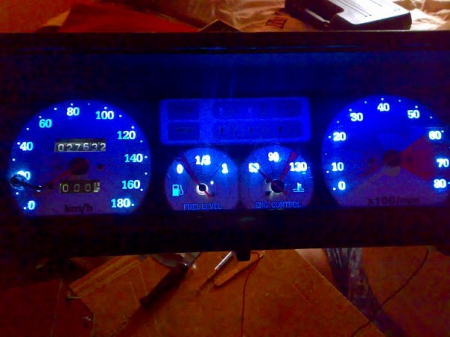
In a situation, if the owner wants to modernize the instrument panel more modernize, it should also use a special (original, as in video) backlight. You can make an original bar with a fluorescent marker, but about it below.

Each driver of a domestic car wants to make the instrument panel of its VAZ-2109 as much as possible and original. Here is one of the options how beautifully can be modified this item machine.
Also need a fluriscent marker or paint. It will change the color if it is influenced by ultraviolet. This technique is often used in modern nightclubs. We also need ordinary bulbs with cartridges, like those in the "tidy". You do not need to change, they will remain in their places. Everything you need can be started.

First you need to remove the plastic, after - the dashboard. Also should not forget about black plastic, which is around the glass. We disassemble the standard insert, as well as arrows. Most often in the new insert there are no holes. Therefore, you will have to do them. For arrows, the holes will be wider than in a regular pad. Otherwise, the arrows will begin to shindle.
Next, it is necessary to dismantle the backlight that is installed. Work should be done carefully, so that the plastic is damaged. We take a board with light bulbs. Install instead of the usual neon light bulb, we stick plastic protection on top. Previously, the factory light bulbs were screwed on it. No need to forget about the control unit of the new neon light bulb. Constantly should be attentive to not confuse polarity.
If it happens, nothing will shine. Next you need to screw the lighting light bulbs. This should be carried out in parallel to the neon lamp. From the inside we lay the wiring, it is necessary to do holes in partitions for this.
Check, whether everything is correct. Inside the light bulbs should be tuned. Further wear the lining and stuck. After these actions, it remains to paint the arrows by a purchased floorish marker or paint. It is advisable to repeat painting in 10 minutes. After that, the arrows can be installed in your place. This tuning is completed.
Check the job, otherwise you have to disassemble everything. If there are no problems, you can collect everything in a strictly reverse sequence. After such a VAZ 2109 will be equipped with a colorful panel like good foreign cars. If desired, with the help of floorscent paint, you can paint the "tidy" lining in a place where the arrow will achieve its limit. It looks very beautiful.

How to change the backlight of the VAZ 2109 panel

An experienced driver during the trip carefully looks not only on the road, but also on the dashboard. It is necessary to follow the appropriate indications of the sensors that are responsible for the operation of the vehicle. It should be noted that the backlight should not be tired and strain the eye.
New machines Plant manufacturer completed with a pale green or yellow backlight. It has a definite effect on the eyes - after a certain period of time they get tired. In this situation, it is better to replace the factory dashboard. For such tuning, you will need a set of diodes, a soldering iron, screwdrivers with nozzles, gloves, as well as iron tongs. Then we need to pick up the color of the backlight. There are many possible options, it all depends on the fantasy.
However, as always in any work, this process has its own nuances. It is recommended to put a soft white backlight if you use a car every day or for long trips. She will not tire his eyes. However, if you use a car rarely, then it is better to put the bulbs of the other, the most diverse color. Now proceed to the installation.

First you need to completely remove the torpedo and disassemble the dashboard. To do this, unscrew the screws that fasten the torpedo with the body. Their number can be found if you explore the instruction manual for the car. It is possible that it is possible to delete the panel, if you disconnect only the pad and the steering column is released to the end down.
Then we need to unscrew the bolts that are in the bottom of the lining. With the help of a screwdriver and a flat nozzle, we use the instrument combination and remove it. It should be especially attentive because it is by chance that you can damage the glass. After that, unscrew the bolts on the back side. Disconnect the glass, and then plastic gasket.
No need to touch the arrows, it should be careful, because you can randomly touch them or knock them down. If this happens, you will have to set them again and, which is even more difficult, adjust the sensors. When considering the back side of the bulbs, you can see the location of all lighting devices, including LEDs.
They will circle the marker and disappear from the chip. Check new light elements with an adapter or battery. It is better to use LEDs because they will consume a minor amount of energy, as well as they have a long service life. Then you need to explore the metallic bellows of diodes so that they are integer. Otherwise, the diode will not shine. Both diode musta insert the microcircuit in the hole, which remained after the preparation of previous light bulbs. With the back of the scheme we solder the mustache.
In the same way, we mount the rest of the diodes. In the reverse sequence you need to build. After we start the car, turn on. Thus, we check how the installed LEDs function.
The instrument panel is one of the most notable details of the interior of any car. And the vazovskaya "ninety-nine" is no exception. Of course, this model was released in the distant nineties, and now the VAZ-21099 instrument panel has a pretty poor design compared to other machines. But still there is a way to improve this spare part, and it is called "tuning".
Here, two ways two ways are opened in front of the motorist - or buy an already protuned panel, which will cost an order of magnitude higher than the standard, or to improve it in its taste, saving several thousand rubles and spending a couple of free time. So let's figure out how to modernize the instrument panel on the VAZ-21099.
What instruments for this will be needed?
Dismantling of the old panel and tuning process
Why start this long, but quite an exciting process? Of course, with dismantling the old dashboard. And first, you need to remove all plastic, that is, a finishing material that hides all unnecessary slots and bolts. Then proceed to the disassembly of the panel itself. It is important to remember - before this process, be sure to disconnect from the battery, otherwise you can be found in the WAZ-21099 instruction manual. The instrument panel, its features and fastening - everything can be found there. In the meantime, let us come back to tuning.

So, we have a disassembled device panel VAZ-21099. In order to improve it, proceed to replace the new arrows. As a rule, the sets of new measuring scales have a wider diameter of the holes, so when installing holes should be drilled by making them wider. This is done so that the new arrows will not "shuffled" to the board, as often happens at motorists. If you do not want to deal with the drilling of holes or simply not sure about the silence of power, you can go on another way, just paint the old arrows in any color suitable for you. The main thing here is to comply with the quality of paint and choose exclusively matte shades, otherwise the scale on the panel will glisten all the time. Extremely can be repainted and all dials can be repainted. It is important to observe the accuracy of the scale, especially on the speedometer.
VAZ-21099 instrument panel - bulbs replacement
After that, we proceed to the installation of neon backlight. The best option will serve that that has the ability to change its shade. But if you do not want it, you can buy ordinary diodes of any color and build them to the place where old lamps stood. Also, when installing, do not confuse polarity, otherwise, after the whole process, your backlight will not burn and you will have to disassemble everything.

The right to be called a car enthusiast is not every vehicle owner, but only the one who is stirred about his beloved car. Beautiful tuning of the VAZ 2109 salon is one of the ways of gentle care and custody, because in this way, the individual features and their own unique design are attached to its car.
It is no secret that at VAZ 2109 Salon, whose tuning was held with her own hands, will look peculiar and according to the tastes of the owner.
Algorithm for tuning salon VAZ 2109

Trust the tuning of the car's salon can, of course, and professionals, but still, work done by your own work looks truly great and always happens to the soul.
What you need to purchase
If the work on refinement will be carried out on their own, then it is necessary to acquire the following materials:
- Vibroplast m2;
- New devices (color is selected depending on the owner's preferences);
- Automotive LEDs intended for all devices;
- Self-adhesive film;
- Fluorescent paint;
- Cartridges and socles;
- New wires;
- New, preferably from the famous and expensive manufacturer;
- Ordinary foil;
- Required tools and so on.
Dashboard and her tuning

As a rule, any tuning of the cabin begins with the instrument panel, which you need to give a delightful and stylish appearance. Of course, do not forget about the practicality of this part of the car.
Backlight

Probably, each owner of the VAZ 2109 dreamed of having in his car the same backlight as on imported models.
Note. It is from the backlight, to a greater extent, the appearance of the car's salon depends.
Let's proceed:
- Remove the staff, disassemble it.
- We dismantle the arrows of the appliances, as well as the old overlay.
Note. In order for the backlight to get better on the lining, it is recommended to make alone cutouts from the inside. They are easy to produce with a heated knife or soldering iron.
- Take the LED ribbon.
- We cut it into pieces of three diodes.
- With the help of a conventional foil attaches uniformity of the glow.

- We take three slices of LED tape for a tachometer and speedometer, and for the temperature pointers and the fuel level is enough one piece.
Note. The factory highlighting of the car will be saved, because it will be assigned the shooter function on the instrument scale.
If it is not very not very, it is possible to upgrade it and, by gluing the LED light bulbs. It also does not hurt them slightly toned so that it is not too bright.
- All the necessary contacts are connected to the contacts on the factory backlight lamp plate.
- Determine before connecting contacts, their polarity.
- To stabilize the current and the power of the LEDs, the best way to apply the driver.
- We apply a current by 12 volts and check how everything works.
- If all is well, we spend the calibration of the arrows.

Panel refinement
The instrument panel can be made much brighter and more original if we change and modify it.
Started:
- We purchase beautiful numbers, ordinary light bulbs with cartridges, paint, ultraviolet lamp and scales panel.
- In the process of removing the panel, do not forget about the black plastic, which is around the glasses.
- Standard insert for arrows disassemble and make holes much wider than done in the regular.
- We take a fee with light bulbs.
- Instead of ordinary insert neon light bulbs.
- Top insert to protect plastics.
- Screw the lights light bulbs, spending them in parallel to the neon lamp.
- We deploy the wiring from the inside, before doing the holes.
- The arrows stain with a special fluorescent paint twice.
- Install the arrows in your place.
- We check everything and if there are no problems, we collect in the reverse order.
Noise insulation and sheathing

After the dashboard tuning was performed, it's time to start.
So:
- We dismantle all the elements of the cabin and regular trim.
- The vibroplast sheets are accumulating all the necessary surfaces (how to carry out high-quality noise insulation is described in detail in the article "VAZ 2109 Salon Noise Isolation").
Note. It usually takes about 14 pieces of insulating material with dimensions of 0.6 x 0.9 meters.
- After conducting noise insulation, we are silent.
- First of all, we change the skin on the ceiling (professionals are advised to sneak it twice, making the interval in 5 minutes).
Note. When carrying out the cabin cladding, it is mandatory to take into account the color gamut and do not forget to puncture the doors, a torpedo, a platform next to the checkpoint and other parts of the car.
Steering wheel and his tuning
All experts and professional professionals believe that the most secure is the regular vehicle steering wheel. It is he who is designed by the manufacturer's plant and that wheel was the necessary tests in line with the design of the car.
In extreme cases, it is recommended to change the steering wheel on the wheel from the same manufacturer, a newer model. In particular, for VAZ 2109, convenient and "grasp" steered from VAZ 2115, etc.
On the other hand, if the owner wants more, then in the market you can always purchase any "Barank", both from the famous manufacturer and steering wheel of handicraft production.

Yet, as it was said above, the optimal option is considered to install a regular steering wheel with a braid, which we will analyze carefully. It should not say that such a steering wheel looks great, and in the hands it keeps very convenient, thanks to the increased thickness of the rim.
Braid
The leather steering wheel looks always amazing. It is always pleasant to the touch, looks presentable and expensive.
In addition, the skin so to speak "breathes", which affects comfort while holding the steering wheel with long trips.
We begin to braid the helm of the skin on your own (this procedure at the masters is very expensive):
- To begin with, we turn the steering wheel steering wheel to make stencil.

- We wind on top of the film paper or better malarious tape.
- Draw a marker on the scotch of the seams.
- Sut the scotch on the markup, making it very carefully.
- Remove stencils that are three.
- Cut the pattern from paper.
- In the leather blank in places where the seams are provided, add 5 mm (along the perimeter of the rim, on the contrary, we remove 2 mm).
- We sew the skin, leaving the minimum margin of the neck of the thread, and cut off the rest.
- We pass the seam around the perimeter of the resulting workpiece.
Note. Sew the best synthetic threads that provide strength and due quality.
- Leather blank apply to the steering wheel.
Note. To reduce the effect of performing seams on the front side, you can cut the grooves on the steering wheel under them.
- Take a thread like a lace in a boot using a needle.
- We skip threads for seam loop on different sides of the braid.
Note. The glue is not applied at all, since the strut braid is fixed so securely.
- Fix at the end of the procedure thread.
- All removed parts and elements put in place.
Rule replacement
If the steering wheel changes to a new one, then the work process will look like this.
Started:
- Disconnect the minus terminal from the battery.
- Take out the key from the ignition lock.
- The steering wheel turns until the moment when the retaining locking lock is shown.
- We apply the appropriate tags on the steering wheel and the instrument panels.
- We take a screwdriver and use the lining of the lid of the beep.
- Then remove it.
- We turn around two screws, remove the cover (act as a curly screwdriver).
- Now you need to arm a head to 24 and unscrew the nut that fixes the steering wheel (we turn off the nut completely, but for several turns).
- The steering wheel is tightened by the shaft slots.
Note. At this stage of the work there may be a problem with removal. In this case, an assistant will help, which will apply light blows with a hammer over the steering wheel, necessarily through a special paint.
- Turn off the nut and remove the steering wheel.
- Tags from the old steering wheel transfer to the new one.
- Install a new steering wheel.
The above instruction is a light tuning of the salon VAZ 2109. There is also a more complete, where the rug is subjected to modernization, the knob, the knob, the nozzles on the pedals, buttons, etc.
In the process of work, it is necessary to use video and photos - materials. The price of the components of the tuning is not large and modernization will cost inexpensively.


