Yak Vistaviti ignition VAZ. Proper adjustment of the ignition system on VAZ vehicles. Adjusting the moment of ignition
Ignition fuel mixes In the cylinders of the engine internal combustion Must occur in a strictly defined point. Incorrect ignition in the VAZ 2106 car is fraught with serious trouble. The car engine begins to work correctly. Ignition adjustment can be performed independently, without the help of qualified specialists. Below in the article we will analyze how to adjust the ignition by car VAZ 2106 and that it will be needed.
Ignition 2106, as the ignition affects the engine and fuel consumption
As mentioned earlier, when the ignition adjustment is incorrect, the car engine VAZ 2106 begins to work incorrectly. The thing is that when the ignition control is impaired, the ignition of the fuel mixture occurs either too early, or on the contrary late.
These violations in the operation of the ignition system are called:
- Early ignition.
- Later ignition.
Problems arising from incorrectly exhibited ignition by car VAZ 2106:
- Reduce dynamic characteristics car. It does not matter which ignition is early or later;
- The engine wear is reinforced;
- The engine gets very hot;
- Increases fuel consumption. To develop the required speed, the engine consumes more fuel.
The ignition of the fuel mixture with a normally adjusted ignition occurs at the moment when the piston is directly in the upper dead point (NTT). It is at this moment when the mixture is ignited by the engine ensures the maximum coefficient useful action (Efficiency).
Tools assistants
To adjust the ignition system by car VAZ 2106, you will need the following tool:
- Multimeter (voltmeter);
- Candle wrench;
- The key to "13".

How to set ignition on VAZ, step-by-step instructions
Before proceeding with the direct ignition adjustment in the VAZ 2106 car.

It should be known that the moment of ignition on this vehicle is set by tags located on the lid of the gas distribution mechanism (TRM).
Three labels are cast on the timing lid, different lengths:
- A short label - corresponds to the angle of the ignition ahead of 10 degrees from the top of the dead point, is designed to drive on the 76th gasoline;
- The average label - corresponds to the angle of the ignition advance of 5 degrees from the top of the dead point, is designed to ride on the 80th gasoline;
- A long label is an ignition advance ange of 0 degrees, the ignition of the fuel mixture occurs precisely in the upper ground point 1 or 4 of the cylinder, is designed to drive on the 92nd and 95th gasoline.

Important! The ignition adjustment is carried out on a muffled car with the ignition turned off.
And so, directly proceed to the ignition adjustment by car VAZ 2106:
- Open the hood;
- Remove high-voltage wire from the spark plug of the first cylinder;
- With the help of a candle wrench, unscrew the spark plug;
- We close the candle hole with your finger or rubber plug;
- We turn crankshaft to the compression tact, that is, until the moment when the piston of the first cylinder does not start moving upwards (it is possible to understand this by how the rubber plug is searched or the air will not push the finger);
- Identify the tact of compression of the first cylinder, set the mark on the pulley, respectively, the required ignition (the label on the timing cover, in our time it is usually the longest label intended for the 92nd and 95th gasoline);
- We collect everything back.


Now go directly to the ignition distributor:
- Pulling the latches fastening lid on ignition distributors;
- Remove the lid;
- Weakening the locking nut key to "13";
- Exhibit parallel to the axis of the engine;
- Tighten the fixing nut (do not delay!);
- Turn on the multimeter (voltmeter);
- The positive diploma multimeter is drawn to the output of the ignition coil, the minus to the "mass";
- Turn on the ignition;
- We start rotating the ignition distributor clockwise, it is necessary to rotate until the voltage on the multimeter disappears;
- Now smoothly rotate the distributor counterclockwise, as soon as the voltage appears again, stop. Ignition adjusted;
- Tighten the fixing nut;
- Collect the ignition distributor.

How to check the ignition, progress on checking the correctness of the ignition adjustment
Now it is necessary to check the ignition in practice. This requires a long, straight and smooth section of the road. Checking the ignition by car VAZ 2106 is carried out as follows:
- We bring the car;
- Fully warming the engine;
- We accelerate the car, gradually reach the 4th gear, the speed should be approximately 45-50 km / h;
- Press the gas pedal "to floor";
- The knock "fingers" appears;
- When the speed increases by 5 km / h, the knock of the fingers should stop;
- This means properly exposed ignition;
- If not, the ignition is not correctly adjusted.

Early ignition, signs and how to fix
About the early ignition will speak reinforced and continuing knocking of fingers, as well as detonation in the engine (twisted cotton).
To fix the early ignition on the VAZ 2106 car, you must disassemble the ignition distributor and turn it into several degrees counterclockwise. After that, it is necessary to collect everything in place and again check the ignition described above.

Later ignition, signs and how to fix
Late the ignition will speak, the inhibited set of revolutions by the engine.
To correct this problem, you need to disassemble the distributor and turn it on a pair of degrees clockwise, and again check the car.

- According to experts, ignition by car VAZ 2106 can be considered adjusted only when at a speed of 60 km / h there is no more than 2-dimensional fingers;
- In the absence of a multimeter or voltmeter, the ignition adjustment can be made using the usual 12 volt control;
- This method of adjusting the ignition in addition to the VAZ 2106 is suitable for the entire carburetor "classics".
As we see ignition adjustment by car VAZ 2106, it is quite possible to produce independently, without any help and access to the car repair shop. On this, our article comes to an end.
To regulate and bring the engine of the classic Vase model - this is useful, and very entertaining and exciting for those who appreciate these cars along with their simple reliable motors. If you can independently set the ignition on your "six", you can be considered a specialist who will figure out in any node of this fairly adult car model. From how much it will correctly work this mechanism, the correctness of the engine will be dependent. Also, this aspect depends on the amount of combustible car consumed, as well as all dynamic characteristics. vehicle.
You can set the ignition on the "six" in several ways, but the most famous among them is setting up tags. More precisely, this procedure is carried out using a special device - a stroboscope, which was created specifically for this purpose. But such a device in the usual garage is a rarity, especially, you can do the usual devices that lie in each drawer with tools. Before working, you will need to find the key for the crankshaft, the key "on 13" and a 12 volt indicator light bulb. The procedure is as follows:
1) The engine must be turned off, and the terminal "-" must be disabled from the battery;

2) Translate the piston in the first engine cylinder to the ignition position. To do this, you will need to remove the corresponding candle. The resulting hole should be closed with a finger, while simultaneously scrolling with the key crankshaft in the direction of the clockwise direction;
3) At the moment when the compression beat comes, you will feel that the finger is pushed with air with a lot of power, which you need to get;
4) Next, it will be extremely important to be accurate to combine the pulley tag with the second mark, which you need to search on the drive cover of the gas distribution mechanism. The average label determines the fact that it is established incendiary ahead for 5 degrees;
5) Sometimes searching labels is slightly difficult, but they are in any case. To find them, you will need to go well with a metal brush on the surface, and then set a brighter light.
6) After the labels are set, the key can be removed. It will also be necessary to return the candle to the place and connect the armored car.
The next stage is setting the moment of ignition. This procedure also implies a clear algorithm of actions:
1) The terminal "-" must be connected to the battery battery;
2) Using the 13th key, you need to slightly loosen the fastening nut on the ignition distributor;
 3)
Next you need to use a test light on which there are two wires. The first must be brought to the "Mass" terminal, and the second must be connected to a low-voltage ignition coil;
3)
Next you need to use a test light on which there are two wires. The first must be brought to the "Mass" terminal, and the second must be connected to a low-voltage ignition coil;
4) You need to turn the key to the "I" position in order to turn on the ignition;
5) It is necessary to carefully turn the dispenser body in the direction of the clockwise direction until the position at which the light will not go out;
7) At the end you need to spin the fastening back and go through the car to check its behavior.
How to check the work performed on the correctness?
And for this there is a clear sequence of actions that need to be performed:
 1)
Check the ignition itself can be in motion. To do this, you need to heat the motor, and dispersed the car to a speed of 40 - 50 km / h. Then you need to switch to the fourth transmission and go a little time without acceleration.
1)
Check the ignition itself can be in motion. To do this, you need to heat the motor, and dispersed the car to a speed of 40 - 50 km / h. Then you need to switch to the fourth transmission and go a little time without acceleration.
3) Normal will be the situation if the sounds stop after a while, which will be enough a speedometer in order to undergo a division of 5 km / h;
4) In case the detonation is longer, you will need to correct the position of the traver;
5) To do this, you need to turn the distributor housing for 1 degree clockwise;
6) If the sound of detonation is very weak or not heard at all, then you need to turn the rubber on 1 degree counterclockwise;
7) It is necessary to perform such adjustment until the detonation duration is in the range of 1 - 1.5 s.
 After the installation or ignition adjustment was performed, you need to correctly put the rubber on the place. To make everything right, you need:
1) Install the first cylinder of the motor in the NWT (top dead dot);
2) You can determine the location of this point after the candle was unscrewed, and the hole is closed with a finger;
3) Then you need to find a label on the crankshaft pulley. This label must be set in one line with a marker on the timing cover by turning the crankshaft clockwise;
5) At the very end, you need to put the housing of the traver.
One of the fastest way to install the ignition is to exhibit "for rumor". In this case, you need to do these actions:
1) First you need to loosen the fastener nut on the ignition distributor;
2) The engine must be warm up, but do not turn off, after which you need to turn the distributor body in turns in different directions;
3) The number of revolutions should be approximately 2000 per minute;
 4)
Next you need to listen to how the motor works. The best position is the largest number of revolutions in the calm operation of the power unit without any failures;
4)
Next you need to listen to how the motor works. The best position is the largest number of revolutions in the calm operation of the power unit without any failures;
5) When this provision is found, you will need to tighten the mount. Everything is simple, right?
How to set ignition on VAZ?


Ignition moment - important parameterwhich greatly affects the engine work. With wrong installed ignition The power and pickup engine is lost, problems appear when the engine is started, fuel consumption increases.
Let's talk more about how to correct the ignition on the VAZ.
Consider the ignition installation method by car VAZ - 2106 according to any of the cylinders.
Preparation for setting up the moment of ignition
Strobeoscope is needed for installing the correct moment of the ignition protrusion. In the store you can purchase a stroboscope with a built-in tachometer. In the absence of a strobe with a built-in tachometer, you can use a tachometer on the car instrument panel or connect an external tachometer.
In the hatch of the clutch crankcase is a special scale, and on the engine flywheel there is a special mark. In order to see the labels, you need to remove the rubber plug. There are labels on the scale, each label corresponds to one degree rotation of the crankshaft.
Step-by-step ignition setting
- You need to remove the rubber and be sure to put the labels on the engine. The slider of a traver with its mobile contact, rotating, distributes the spark by the engine cylinders. The moment of filing the spark should occur at the end of the compression tact.
- Estate any of the cylinders in the compression tact. To do this, you need to unscrew one of any candle. You can make a paper cork, if there is no such possibility, then the hole under the candle can be closed with a finger, tightly pressed it to the hole.
- We rotate the crankshaft until the cork sees. Traffic departure says that this cylinder is at the end of the compression tact. Then we put the rubber and install it on the digital label to that cylinder, which is at the end of the compression tact.
- We take a vacuum adjustment angle of ahead and turn it a little. After that, we connect all the wires leading to the traver, and wear the lid of the traver.
- Screw the candle to her place, clamping it with the key, and tighten the bolts of the traver. We wear the wire on the candle. Now you can start the engine and check its performance. To measure the ignition advance angle, you need to connect a strobe to rechargeable battery Engine.
- Next, we run the engine and direct the stream of light of the strobe on the clutch crankcase hatch. With the right moment of ignition, the label of the flywheel should be between the middle neck and the previous division of the scale.
- To increase the ignition advance angle, turn the rubber clockwise, to reduce the ignition ahead, rotate the rubber counterclockwise. Remember that all operations need to be carried out on a warm engine.
"Ignition on the light bulb"
There is another method for setting the engine ignition. In the people, this method is called "Ignition on a light bulb." This method allows you to accurately establish the moment of ignition.
To do this, you will need a tester (or indicator screwdriver), a set of probe, key to 13 and the key to rotate the crankshaft.
- First of all, you need to set a gap in the interrupter. To do this, you need to remove the holders of the interrupter cover and remove the rotor of the breaker. Next, you need to turn the crankshaft to the bottom of the bottom point. Then you should check the gap dip. The clearance must be in the range of 0.3 - 0.4 mm. If the gap will go out due to these limits, the ignition setting method will be useless.
- Next, rotate the crankshaft and combine the pulley label with the average label on the lid of the gas distribution mechanism. The average label corresponds to the ahead of the advance of 5 degrees, a short-corner of 10 degrees, a long - angle of 0 degrees. At an angle of 0 degrees, the piston is in the upper dead point. It should be paid to the fact that the advance angle of 5 degrees should be set when the engine runs on gasoline with octane number 92 and 95 (gasoline A-92 and A-95). If your engine works on gasoline with octane number 76, then one should be combined with a long label that corresponds to an angle of 0 degrees.
- Turn on the ignition. We take an indicator screwdriver and put it on a low voltage chain. We start to rotate the rubber towards the runner. At the time of sunbathing the bulb is a spark.
- Next, you should tighten the traver bolts.
Checking the angle of ignition
After completing all the above actions, you can check the correctness of the ignition advance angle.
For this you need:
- Start the engine on idling There should not be failed in the engine.
- Check the correctness of the ignition advance angle when driving. At a speed of 50 km / h, it is necessary to squeeze the gas pedal failure. There should be knobs; If they are not heard, it means that Ignition later and you should check a bit of the rubber clockwise. If detonation does not disappear, then the ignition is early and, accordingly, you should turn the rubber counterclockwise.
Now you know how to set the ignition on the VAZ. To help you also other articles of our site on similar subjects.
On the cars of the VAZ family falling under the category "Classic", including on the "six", is established electrical system ignition. The exception is its modified versions in which mounted contactless system. In the first case, the B117A brand tool was used as a coil, while the modified was equipped with a series coils 27 3705. Home distinctive trait Both devices consisted in the difference in some elements of the winding. The only thing that remains the same is the "habit of" frequent failure (by the way, in the same principle, the ignition of the VAZ 2107, "seven") was built and ignition.
O on the VAZ of the "Classic" family
At the "Classic" a standard engine launch lock was installed, which was not fundamentally different from previous representatives of the VAZ family. There are three main details in its design:
- Contour part.
- Anti-theft device.
- Lock.
At the same time, if the anti-theft device failed, car enthusiasts had to change the entire system in complete set. The contact part, which is placed in the ignition housing, can be replaced in a separate order. Installation of the launch device (ignition) of the car on the vases is performed under the front panel, namely under the instrument panel (to the left of the driver), on the fastening bolts of the steering shaft.
All these three components should provide a coordinated and trouble-free start of the motor, because it is from their state that the efficiency of the entire vehicle will depend on their state. As a rule, the question "How to set ignition on VAZ" (21213 Including) Car owners are specified not earlier than 100,000 mileage kilometers, since the setting of the lock itself performs the manufacturer itself on the conveyor. But if this question still originated, you need to take certain measures. If you do not adjust the ignition lock on time, your car at least will overcome fuel, and even completely stops normally to start, even "hot."
Symptoms talking about the breakdown of the ignition lock system on VAZ cars
Before setting the ignition on the VAZ 2105 (however, as on any model), it is necessary to make sure whether the breakdown really lies in the key. The most likely symptom of this in the event of malfunctions in the ignition lock can serve as an overheated engine and bad speaker overclocking. In addition, it happens that at the low and medium turnover in the cabin, the characteristic ringing is heard in motor compartment. More about turnover I also want to say that the car can slightly shook if it is incorrectly set or adjusted the ignition lock.
Is this a ignition lock?
Each experienced car owner knows that signs like overheating of the motor, the loss of car dynamics and increased flow Fuels may not arise at all due to the lock, but because of a number of other technical problems. This may be a malfunction in fuel system, poorly adjusted carburetor or simply low-quality gasoline. Therefore, in order to make sure whether this is a symptom of malfunction of the ignition lock, you need to pay attention to the candles. It is by their state that it can be determined that this is a breakdown, and what it is caused.
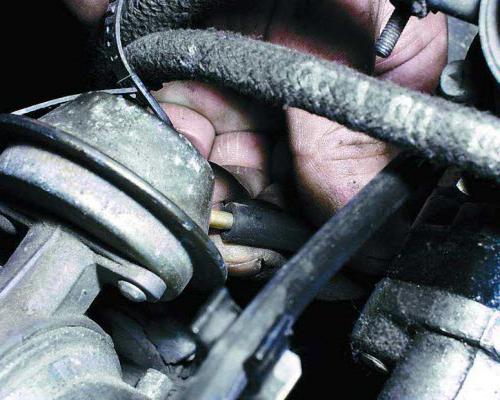
Before setting the ignition on the VAZ 2106, motorists pay attention to the number of deposits in the working part of the candle. If so much dirt accumulated on her surface, as on this photo ...

... That is definitely the reason lies in the ignition lock. There are so many plates that it simply makes no sense to restore the working surface of this incendiary element. Otherwise, after a few hours of long and painful work, you will not achieve anything anyway, and the electrode will again not serve as a spark in normal quantities. As a rule, the working surface of a candle with a black oily sediment is no longer subject to recovery. The same applies to parts with a thick layer of plaque on the working surface. Such parts are only replaced. But if you still want to try to restore the characteristics and clean the candle from contamination, you can produce the following manipulations:
- Put a candle in 2 or 3 cylinder heated and serviceable internal combustion. Here the heating temperature is slightly higher, since the combustible fuel and air mixture is more depleted than in 1 and 4 cylinders.
- Process the work part with sandblasting.
In a different way, the ignition is simply impossible. Other ways, such as cleaning with a metal carriage or calcining the surface, is only a waste of time, and you definitely do not achieve the desired result. Therefore, in order to save personal time, change the candle in the kit.
At the same time, it is necessary to pay attention to how many kilometers your candles have already been "bully." If they are operated for more than 30 thousand kilometers, it means that, subject to the accumulation of nagar and pollution - such item must be changed. Experts recommend replacing candles at least once a year, even if 30 thousand did not increase on the speedometer during this period. But in any case, you should not wait for the moment until they fail. This can significantly affect the technical condition of the car, and not for the better.
The candle is wearing in the process of reducing the height of the central electrode and the cross section of the outer. During the engine operation, the thin end of the outer electrode is heated to such a temperature, which is sufficient to ignite the working mixture in the combustion chamber. If the liquid flammifies independently of the spark (this process is known as disorderly ignition), then in this case the driver can feel a noticeable loss of engine power. Sometimes it happens that even when the ignition is turned off, the motor does not stop working. This indicates that the candles came into a malfunction, and with them - which is quite possible - and the ignition castle.
But how to set ignition on VAZ 2106 in this case?
In this case, it is best to simply replace the candle with a new detail. But if you decide to restore it, try cutting the clogged part of the outer electrode with the appropriate tool. At the same time, do not neglect the gap of the candlelight, which should be 0.55 mm. If your VAZ works on a 76th gasoline, this value is permissible to increase to 0.6 millimeters. But if the gap will be very big, it will significantly complicate the start of the motor in the cold season, and besides, it will lead to significant fuel overrun. And this happens because the spark formed in the electrode can sometimes disappear, not reaching its end point destination. For the future helpful advice: To ensure that there are no such situations, it is better to always with you to carry a new set of spark plugs (and preferably the trambling lid and the slider). Still, VAZ is not "Mercedes", and he may be broken at any moment. Well, with the "six" more or less figured out. And learn how to set ignition VAZ 2107-21099, you can be slightly lower.
Are the distributor in everything?
As practice shows, it is this product that the most often fails. It is also worth noting that it may not break the distributor itself, but any small element of its design. So, one of the smallest and unreliable parts is a ball bearing 900706U, which is supplied with a diaphragm of a vacuum corrector. In addition, the distributor lid may break. Most often it is either deformation in the form of a crack, resulting from mechanical damage, or a layer of deposits in the form of oil with graphite. Another distributor lid does not like water very much and in cases of wetting also fails.
If you have broken ball bearing, you will notice that the motor stopped "pulling", and feel how it works badly on idling. Often, adjust something in this case is simply impossible. However, if you want to set ignition (on VAZ 2114, for example) with a broken distributor lid, you can try to correct the position by following the following series of work:

In this way, Ignition can be set on the VAZ 2105-2110 and return the lock to the normal mode. However, often in such cases increases fuel consumption (by 3-5 percent) and the concentration level of CO 2 increases exhaust gases car.
By the way, with similar "symptoms" on Niva cars, Vaz "Kopeika" and "six" strongly walks the tachometer arrow throughout the scale, regardless of what is the true turnover of the engine.
So, let's look at how to set ignition on VAZ 2106.

Since the design of the "classics" and the vases of the "ninth" family is almost the same, you can apply the instructions offered by us to almost all models of cars of the Volga Plant manufacturer.
Before setting ignition to VAZ 2106-2110, we need to prepare several wrench keys (at 13, 14 and 36 millimeters), as well as a minus screwdriver and a set of probe to measure the gaps. Using wrench on 13 and 14 millimeters, we will unscrew the mounting elements of the throat. With the help of a 36-millimeter tool, we have to turn the crankshaft ratchet.
So how to set ignition on VAZ 2110? To begin with, we take the key to 36 and unscrew the crankshaft clockwise. You need to turn on yourself. At this point you need to carefully inspect the contact in the rubble. I exhibit very much big Clearance Contact. To do this, you need to take probe by 0.40 millimeters. If the value obtained does not correspond to the exhibited, it means that the clearance must be adjusted. In this case, we take a flat screwdriver and weaken the screw fastening screw. Now with the help of eccentric, it should be set (increase or decrease) the gap. At the same time, the diploma itself should be between the moving and fixed parts of the contact of the trambler.
How further is the ignition adjustment?
VAZ 2106 and all other of its "counterparts" are repaired in the same way: after the contact clearance was set, go to the adjustment of the next important parameter. Now we need to adjust the ignition clearance. How to set ignition on VAZ 2110? To do this, with the help of a key to 36 rotate the crankshaft pulley clockwise, until the label coincides with the notch we need on the timing (gas distribution mechanism). There are only three of them. The first denotes an angle of 10 degrees, the second is 5 degrees of ahead, and the third (it is the longest) we will not need, as this is the top dead point. We need only the second label.

After setting these values, check the first cylinder piston, which should be located at the top dead point. This can be done as follows: Remove the cylinder candle, which is located near the rubbler, and insert a screwdriver into the candle hole. If the piston is located at the top, the screwdriver immediately flies into it. If not, the crankshaft pulley should be rotated 360 0 and again set it on the tags.
Note! In order to correctly set the ignition, the VAZ 21213 (in principle, like any other car) should be cold, since the temperature contributes to the appearance of errors. During the execution of these works it is necessary to take into account that the crankshaft can rotate 360 \u200b\u200bdegrees, and camshaft - Only 180. It is due to this characteristic that the piston will turn out to be the top point.
At the next stage, we will need a 12-volt light bulb with 2 soldered wires. One of them we connect to the "mass" of the car (to the body or engine), and the second we connect to the contact of the traver.
Final stages
Next, you will not have any problems with how to set ignition (VAZ 21099, 2114, 2115 or 21213 - not the essence, the principle of work is still the same). With the help of a 13 mm wheelbarh key, unscrew the connecting elements of the last above part and rotate them until the lamp lights up. The latter should not be completely shone, but only right enough. If, when connected, it immediately caught fire, it means that the rubber should be rotated clockwise until it goes out. As soon as it happened, you need to catch the moment when the light bulb will smoothly crawl. Then the ignition is ahead, and we will remain tighten the fastening back, put the lid and run the engine. Everything, the task "How to set ignition VAZ 2103-2110" is solved.
We repair the VAZ 2106. How to set ignition? Method number two: We use a stroboscope
You can go to another way. In this case, we need to install a small gap between the interrupter contacts. After the lid of the traver was removed, the crankshaft should be installed in such a position in which the clearance would have the maximum value. Now we unscrew the bolt-lock on the bearing plate and with the help of the probe we select the appropriate position, which is equal to its light movement. Next, you need to tighten the screw and find labels on the engine. This is 0, 5 and 10 degrees. A similar markup is present on the rim of the crankshaft pulley. I exhibit now ignition.
After all these operations, we take a special device - a stroboscope. When you assume it is adjusted. But since this tool works from the power grid, it should be connected to the battery wire bar. The hose of the vacuum corrector in this case should be enhanced. Now we run the engine and wait until the speed at idle becomes stable. After that, we relax a little fastening of the traver (in order to further turn it out). Next, we guide the strobe to the markup, which is on the engine and on dividing in 5 degrees, set the ignition value for the 92th gasoline. If you have a VAZ "Tenth family", it means to exhibit a gap of 0 degrees. It is designed to consume gasoline with an octane number of 95 or more. After completing all these manipulations, do not forget to spin the retainer back. Well, at this stage, the question "how to set the ignition (on the VAZ 2104 in this thank) with the help of stroboscope" can be considered closed.

In the photo on the right you can see a stroboscope in action. Below we will look at how to set ignition VAZ 2111-2106 without strobe.
If you have no mentioned fixture at your hand, you can replace it with a 12-volt lamp. You still need a few wires. In the same way as described above, you will need to scroll through the crankshaft to exhibit the necessary labels. After that one wire from the lamp need to be connected to the tank coil. The second wire will be "mass".
We need to turn on the ignition. To do this, weaken the wire again. Next, you should find a position in which the voltmeter will show the averaged values. In this case, it is unacceptable that the lamp went out or shine is too bright. Then back to fix the bolt and put the rubber into place. Remember that weakens the screw need no more than 2 turns.
In principle, all of the above methods lead to the same result. And whatever you have taken advantage of them, all the same at the exit you will be adjusted ignition. The differences between the procedures are not too significant, however, as the design of the "tenth" family vases or the same "classics". Therefore, it is possible to use all ways to adjust the ignition key in almost any model, starting with the legendary "penny" and ending with the "prior light".
Go ahead. How to put ignition is not an exception), we have already found out. But is it really influenced work in the economy? How correctly the gaps were put up, we learn on the move machine. To do this, warm the vase engine to operating temperature In 85 degrees Celsius (when another arrow is in a green scale) and find a smooth and straight line of the road.
Peculiar test drive

After the internal combustion engine was heated to the required temperature, we leave on the track and accelerate to 50 kilometers per hour. In this case, it is necessary to switch to the fourth gear and sharply press the gas pedal to the floor. If at this time you heard quiet and short crossings, you can rejoice: this suggests that the ignition you put out correctly. In this case, turn the lid of the traver clockwise, and boldly go, where your soul wishes, at any distances. By the way, for the vases of the classics family, it is enough to accelerate up to 40 kilometers per hour and switch to the fourth gear.
In the continuation of the knocks ... in case during abrupt touch Gas to the floor you felt loud and characteristic sounds, know, this suggests that all adjustment is incorrect. This is also evidenced by such signs as engine overheating, the drop in power or elevated therefore, we return to the question of how to set ignition VAZ 2108-21099.

Unfortunately, all possible options We have already considered solutions to the problem. But it is not worth upset, because even from a hopeless situation can always be found. So, what if the work was done wrong? In principle, the only correct solution will be the appeal to the station maintenance. Qualified and experienced masters will quickly and efficiently establish ignition (on VAZ 2104 and on any other model). By the way, such a service will cost you quite inexpensively, about a few hundred rubles.
Conclusion
Now you know exactly how to set ignition VAZ 2108-21099 (with your own hands, by the way). As for the methods and methods of the mentioned adjustment, we note one thing: final result All the works produced will be the same. Therefore, fundamental differences between the exact same option will be selected to adjust the ignition of the car, it is simply no. The only thing worth paying attention is that with the use of a stroboscope to set the necessary gap is much easier. Well, of course, without probe here you will not do anything.
The well-known advantage of carburetor motors of the VAZ family is their simplicity and high maintainability. At the same time, unlike injector models, carburetor "six" from time to time may require manual ignition.
How to put the ignition on the VAZ 2106 by tags
The most accurate result with on the carburetor "six" can only give a stroboscope - specially intended for this device. BUT B. garage conditions, for the absence of a stroboscope, you can also set up the system, based on the usual devices that have every driver.
For work you will need a 12-volt control light, the key to 13 and the key for the crankshaft:
- Need to disabled Engine, With a disabled "minus" terminal of the AKB.
- Install the first CBO cylinder piston to the ignition position. To do this, you will need to unscrew the spark plug out of it. Cut the candle hole with your finger and at the same time turn the crankshaft key clockwise.
- When there is a compression tact, the air under pressure will begin to push the finger strongly - this is what you need.
- Now it is important to clearly combine the label on the pulley with the second, which are looking at the timing cap. The mark in the midst means that the ignition is exposed to 5 degrees.
- It happens that some cannot find tags. But in fact there is always a label. Just well wipe the surface with a metal brushing, add light.
- After setting tags you can shoot the key. Turn back the extracted candle back and connect the armored car.
Video Tutorial on the replacement of ignition lock on VAZ 2106
The next stage of the work will be determined by the point of ignition:
- Connect the "minus" battery terminal before starting.
- Using the key to 13, you need a little weaken the fastening nut of the ignition distributor.
- Here you will need a harvested test light with two wires. One conclusion is connected to the "mass", the second to the low-voltage ignition coil.
- Turn on the ignition by turning the key to the "I" position.
- You need to gently rotate the ignition distributor body clockwise until the control light goes out.
- After that, it is necessary to smoothly rotate the rotor of the distributor counterclockwise - until the contact is open and the light bulb will not be lit.
- Now you need to tighten the mount and check the behavior of the car on the go.
Checking the correctness of the ignition:
- Check the ignition operation can be directly on the road. To do this, warm the motor and bring the speed to 40-50 km / h. At the same time, go to the fourth gear and move some time without acceleration.
- Then cut the gas pedal sharply and listen to the engine. The sound of detonation or "ringing fingers will be heard.
- Normally, if the ringing stops after the time required by the speedometer arrow to overcome the segment of 5 km / h.
- If detonation is observed longer, it is recommended to adjust the position of the traver.
- To do this, turn the ignition distributor housing by 1 degree clockwise.
- When detonation is heard very weakly either, it is not available at all, you need to rotate the rubber for 1 degree counterclockwise.
- This will have to regulate the ignition until the detonation becomes settled in 1-1.5 seconds.
What to do if the rubber shot
This follows:
- Replace the first cylinder of the motor in the upper dead point (NMT).
- It is possible to find NTC without special devices by plugging the candle hole, as described above.
- Next is the label on the crankshaft pulley. It must be combined, by turning the crankshaft clockwise, tagged on the timing lid (average label).
- You need to remove the cover from the distributor and set the slider so that it "watches" right on the contact in the cover of the first cylinder.
- Insert the traver housing.
I exhibit the ignition "for rumor"
As mentioned above, the highest quality will only work with the help of a stroboscope. But after all, to the maintenance station still need to somehow get.
For such cases, a quick method of selling ignition "For rumor" is perfect:
- First of all, loosen the fastening nut of the ignition distributor.
- Warming up the engine and without turning it off, rotate the dispenser's body alternately in both directions.
- Turns must correspond about 2000 rpm.
- Listen to the motor operation. The best position is when the maximum possible number of revolutions is issued with a solid operation of a power unit without failures.
- To find this situation, you can delay the mount.
How to install contactless (electronic) ignition on VAZ 2106
It is no secret that the contactless ignition system (BSZ) is better than the usual contact, which is directly reflected in the quality of the operation of the power unit. At the same time, almost any "six", regardless of the year of its release, can be re-equipped under the BSZ.
This will require:
- drill, drill;
- key horny at 13;
- keys on 8, 10;
- key for ratchet.
Installation of installation Next:
- Find under the hood of a place intended for fastening the switch and the contactless ignition coil. Set these items using when necessary drill to drill mounting holes.
- The second step should be the installation of a traver. At the same time, exhibit in accordance with the labels: the crankshaft is at risk of NTC. The old rubber point will indicate the first or fourth cylinder. Remember the position of the trimmer case, the direction of the runner. Apply the corresponding marks if necessary. The new rubber is installed in the same position.
- Place the ignition in accordance with the above instruction.
- news
- Workshop
Ban on manual traffic police radars: in some regions it is removed
Recall that the ban of manual radars for fixing violations of traffic rules (Models "Sokol-Visa", "Berkut-Visa", "Vizir", "Vizir-2m", "Binar", etc.) appeared after the letter of the head of the Ministry of Internal Affairs of Vladimir Kolokoltsev about the need to combat corruption in the ranks of traffic police officers. The ban began to act on July 10, 2016 in many regions of the country. However, in Tatarstan, DPS inspectors, ...
In Russia, the demand for Maybahi sharply increased
Russia continues to grow sales of new luxury cars. According to the results of the study conducted by the Avtostat Agency, at the end of the seven months of 2016, the market of such cars amounted to 787 units, which is 22.6% more than in the same period last year (642 pcs.). The leader of this market is the Mercedes-Maybach S-class: on this ...
New sedan Kia will be called Stinger
Five years ago at the Frankfurt Motor Show Kia introduced conceptual sedan Kia. GT. True, the Koreans themselves called him a four-door sports accumulation and hinted that this car would be able to become more affordable alternative Mercedes-Benz CLS and Audi A7. And now, five years later, the concept car Kia GT was transformed into Kia Stinger. Judging by the photo ...
Limousine for the president: the next details are disclosed
The site by the Federal Patent Service continues to be the only open source of information about the "Authority for the President". At first, we patented the industrial models of two cars - limousine and crossover, which are part of the project "County". The tinnitus registered the industrial sample called the "car instrument panel" (most likely, it is ...
Named average price new car in Russia
If in 2006 the weighted average price of the car was approximately 450 thousand rubles, then in 2016 - already 1.36 million rubles. Such data leads an analytical agency Avtostat, who has studied the situation in the market. Like 10 years ago, the most expensive on russian market There are foreign cars. Now the average price of the new car ...
Dakar-2017 may pass without a KAMAZ master team
The Russian team "KAMAZ-MASTER" is currently one of the most powerful rally-raid teams of the planet: From 2013 to 2015, blue-white trucks took gold Marathon "Dakar" three times, and this year the crew under the leadership of Airat Mareev became the second. However, according to the Agency TASS, the director of NP KAMAZ-Motorsport Vladimir ...
Mercedes will release Mini Gelendeshenage: new details
New model, designed to become an alternative to the elegant Mercedes-Benz Gla, will receive a brutal appearance in the "Gelendevagen" style - Mercedes-Benz G-Class. The German publication AUTO BILD managed to find out new details about this model. So, if you believe in insider information, then Mercedes-Benz GLB will be distinguished by an angular design. On the other hand, full ...
Mitsubishi will soon show a tourist SUV
Abbreviation GT-PHEV is decrypted as Ground Tourer, a travel car. At the same time, the conceptual crossover should proclaim the "new design concept of Mitsubishi - Dynamic Shield". Force aggregate Mitsubishi GT-PHEV is a hybrid installation consisting of three electric motors (one - on the front axle, two - on the back) to ...
Suzuki SX4 survived restyling (photo)
From now on, in Europe, the car is determined only with turbocharged engines: gasoline liter (112 hp) and 1,4-liter (140 hp) by aggregates, as well as 1,6-liter turbodiesel, developing 120 horse power. Before modernization, the car was also offered with a 1.6-liter 120-strong atmospheric gasoline engineHowever, in Russia this unit will be saved. In addition, after ...
In Russia, the roads will appear for unmanned cars
Construction of special roads for the use of robots should be part of the profile plan for the development of unmanned traffic, the Russian newspaper reports. In this regard, the Ministry of Transport is already creating a special interdepartmental group, said Department of Development Program Department Alexander Slavutsky. To organize such roads, the authorities will have to revise the design standards. In particular, you will need ...
How to exchange your car to a new one, how to exchange the car.
Tip 1: How to exchange your car for a new dream of many motorists - come to the salon on the old car, and go to the new! Dreams become a jaw. More turns are gaining an old car exchange service for New - Trade in. You do not...
Cars for real men
What a car is able to cause a man a feeling of superiority and pride in a man. This question was trying to answer one of the most titled prints Financial and Economic Journal Forbes. This printed edition tried to determine the most male car By rating their sales. According to the editorial office, ...
What car russian production The best, the best Russian cars.
What kind of car is the best in the history of the domestic automotive industry good cars. And the best of them choose difficult. Moreover, the criteria for which one or another model is estimated can be very different. ...
Where can I buy new car in Moscow? The number of car dealerships in Moscow will soon reach a thousand. Now in the capital you can buy almost any car, even Ferrari or Lamborghini. In the struggle for the client, the salons go to all sorts of tricks. But your task ...
How to choose a used car, what a used car to choose.
How to choose a used auto who want to buy a car quite a lot, but not everyone has the opportunity to purchase a new car in the cabin, which is why it is worth paying your attention to used cars. Their choice is not easy, and sometimes it's from all the variety ...
Choose a car: "European" or "Japanese", buying and selling.
Choose a car: "European" or "Japanese" going to acquire new car, the car enthusiast will undoubtedly face the question of what preferred: the left handlebar of the Japanese or the right - the legal - "Europeans". ...
Overview of the most popular crossovers and their comparison
Today we will consider six crossovers: Toyota RAV4, Honda CR-V, Mazda CX-5, Mitsubishi Outlander., Suzuki. Grand Vitara. and Ford Kuga.. To two very fresh new items, we decided to add more and debuts of 2015, so that the test drive crossover 2017 was more ...
How to choose a car, buying and selling.
How to choose a car Today, the market offers buyers a huge selection of cars, from which eyes simply run. So before you buy a car is worth considering a lot important moments. As a result, deciding with what you want, you can choose a car that will ...
The most hijacked cars of Moscow in 20188-2019
The rating of the most hijacked machines in Moscow remains almost unchanged for several years. About 35 cars are caught daily in the capital, and 26 of them are foreign cars. The most hijacked stamps according to the portal "Prime Insurance" the most hijacked cars of 2017 in ...
- Discussion
- In contact with


